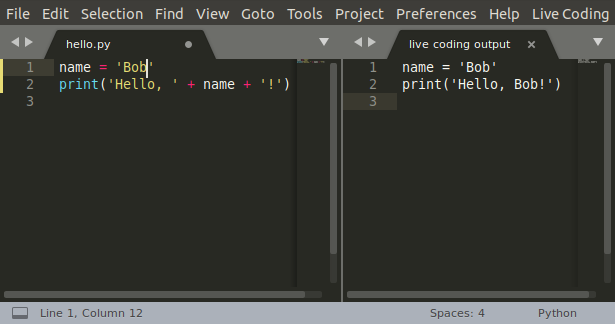
Live Coding in Python lets you run your Python code as you type it. For example, this code prints a greeting to my friend, Alice.

When I change the name to Bob, the display on the right immediately changes. I don’t even have to save the file.
In this tutorial, I’ll demonstrate a live coding display that can be used to show you what’s happening inside your code, live unit tests, and previews of Matplotlib plots and Pyglet user interfaces. To try it yourself, follow the Sublime Text installation instructions, then type some code, as in the example above. Finally, from the Live Coding menu, choose Start. You should see the display on the right. You can also watch my demo video.
Live Coding Display
I’ll start with a trivial chunk of code where I assign a variable, and then modify it.
s = 'Hello'
s += ', World!'
That’s easy to step through in your head and see that s is now
'Hello, World!' Remember, though, that I want to let your brain focus on
writing code instead of stepping through it.
From Sublime Text’s Live Coding menu, I choose Start, and it opens the live coding display like the one on the right (below). The display shows me what’s in the variable after each change.
# Original source code                   | # Displays variables and loops
s = 'Hello'                              | s = 'Hello'
s += ', World!'                          | s = 'Hello, World!'
Let’s do something more interesting and write a library function that does binary search for a value in a sorted array. The live coding will show us what’s happening in our code so we don’t have to hold it all in our heads.
def search(n, a):
    return -1
It’s a bad search function that never finds anything, but let’s see how it works when we call it.
def search(n, a):                        | n = 2 | a = [1, 2, 4]
    return -1                            | return -1
                                         |
i = search(2, [1, 2, 4])                 | i = -1
You can see the input parameters at the start of the function, and the return value at the end.
We’ll start looking for the value in the array, and the first place to look is the middle item.
def search(n, a):                        | n = 2 | a = [1, 2, 4]
    low = 0                              | low = 0
    high = len(a) - 1                    | high = 2
    mid = low + high // 2                | mid = 1
    if n == a[mid]:                      |
        return mid                       | return 1
    return -1                            |
                                         |
i = search(2, [1, 2, 4])                 | i = 1
That was lucky! It was in the first place we looked, and you can see the
calculations as it goes. You see an abstract formula in the code, like
high = len(a) - 1, and you see the concrete result in the live coding
display, like high = 2. However, a search function usually won’t find the
item we’re searching for on the first try. Let’s ask for an item earlier in the
list and use a while loop to find it.
def search(n, a):                        | n = 1 | a = [1, 2, 4]
    low = 0                              | low = 0
    high = len(a) - 1                    | high = 2
    while True:                          |          |
        mid = low + high // 2            | mid = 1  | mid = 0
        v = a[mid]                       | v = 2    | v = 1
        if n == v:                       |          |
            return mid                   |          | return 0
        if n < v:                        |          |
            high = mid - 1               | high = 0 |
    return -1                            |
                                         |
i = search(1, [1, 2, 4])                 | i = 0
The loop runs twice, and each run adds a column to the display showing the calculations. That’s a good example of how this tool differs from a debugger. With a debugger, you’re always looking at a single moment in time. Here, you can see the whole history of the search laid out on the screen, and you move back and forth through time just by moving your eye. It’s a lot like the difference that makes static visualizations of sorting algorithms easier to follow than animated sorting algorithms.
Now let’s look for an item later in the list.
def search(n, a):                        | n = 4 | a = [1, 2, 4]
    low = 0                              | low = 0
    high = len(a) - 1                    | high = 2
    while True:                          |         |
        mid = low + high // 2            | mid = 1 | mid = 3
        v = a[mid]                       | v = 2   | IndexError: list index out of range
        if n == v:                       |         |
            return mid                   |         |
        if n < v:                        |         |
            high = mid - 1               |         |
        else:                            |         |
            low = mid + 1                | low = 2 |
    return -1                            |
                                         |
i = search(4, [1, 2, 4])                 | IndexError: list index out of range
Oops, I get an IndexError. Without the live coding display, I would just get a
traceback that shows where the error happened, but not how it happened. Now, I
can walk back from the error to see where things went wrong. mid is the index
value, and it’s calculated at the top of the loop. The two values that go into
it are both 2, so they should average to 2. Oh, I need parentheses to calculate
the average.
def search(n, a):                        | n = 4 | a = [1, 2, 4]
    low = 0                              | low = 0
    high = len(a) - 1                    | high = 2
    while True:                          |         |
        mid = (low + high) // 2          | mid = 1 | mid = 2
        v = a[mid]                       | v = 2   | v = 4
        if n == v:                       |         |
            return mid                   |         | return 2
        if n < v:                        |         |
            high = mid - 1               |         |
        else:                            |         |
            low = mid + 1                | low = 2 |
    return -1                            |
                                         |
i = search(4, [1, 2, 4])                 | i = 2
What happens if we try to find a value that’s not in the list?
def search(n, a):                        | n = 3 | a = [1, 2, 4]
    low = 0                              | low = 0
    high = len(a) - 1                    | high = 2
    while True:                          |         |          |         |         |
        mid = (low + high) // 2          | mid = 1 | mid = 2  | mid = 1 | mid = 1 |
        v = a[mid]                       | v = 2   | v = 4    | v = 2   | v = 2   |
        if n == v:                       |         |          |         |         |
            return mid                   |         |          |         |         |
        if n < v:                        |         |          |         |         |
            high = mid - 1               |         | high = 1 |         |         |
        else:                            |         |          |         |         |
            low = mid + 1                | low = 2 |          | low = 2 | low = 2 |
    return -1                            |
                                         |
i = search(3, [1, 2, 4])                 | RuntimeError: live coding message limit exceeded
I guess that while True wasn’t such a good idea, we’re stuck in an infinite loop. If you want to see some of the later loop runs, you can scroll over to the right.
From the third run on, the values in the loop don’t change, so we probably want to exit from the second or third run. If you look at the end of the second run, you can see that high is lower than low. That means that we’ve searched all the way from both ends to meet in the middle, and it’s time to give up.
def search(n, a):                        | n = 3 | a = [1, 2, 4]
    low = 0                              | low = 0
    high = len(a) - 1                    | high = 2
    while low <= high:                   |         |
        mid = (low + high) // 2          | mid = 1 | mid = 2
        v = a[mid]                       | v = 2   | v = 4
        if n == v:                       |         |
            return mid                   |         |
        if n < v:                        |         |
            high = mid - 1               |         | high = 1
        else:                            |         |
            low = mid + 1                | low = 2 |
    return -1                            | return -1
                                         |
i = search(3, [1, 2, 4])                 | i = -1
At this point, I think I’m done. I can add a few entries and search for them to make sure everything is working. Also, if this were a real library module, I wouldn’t want to execute a call at the end of the file, so I only do it when I’m in live coding mode.
if __name__ == '__live_coding__':
    i = search(3, [1, 2, 4])
Live Unit Tests
In that example, I kept changing the parameters to search for different items in the list. Wouldn’t each set of search parameters make a nice unit test? I think unit tests help you write better code, so you can use the live coding display as you add each unit test and make it pass.
In this section, I’ll write a function that counts the number of unique words in a list. However, words with the same letters are counted as the same word. For example, the words “apple”, “lemon”, and “melon” would only count as two words, because “lemon” and “melon” have the same letters in different order.
To start, I write a simple unit test that doesn’t have any duplicates.
from unittest import TestCase
from anagrams import count_anagrams

class AnagramsTest(TestCase):
    def test_words(self):
        words = ['apple', 'melon']

        n = count_anagrams(words)

        self.assertEqual(2, n)
I can run that in the shell with a Python command like this:
python -m unittest test_anagrams.py
Of course, that fails when I
run it as a unit test, because I haven’t written the count_anagrams() method.
I start by creating anagrams.py with a stupid version that always returns
zero.
def count_anagrams(words):
    return 0
The test now fails with a reasonable complaint.
$ python -m unittest test_anagrams.py
F
======================================================================
FAIL: test_words (test_anagrams.AnagramsTest)
----------------------------------------------------------------------
Traceback (most recent call last):
  File "/home/you/workspace/scratch/test_anagrams.py", line 10, in test_words
    self.assertEqual(2, n)
AssertionError: 2 != 0

----------------------------------------------------------------------
Ran 1 test in 0.000s

FAILED (failures=1)
$
I want to see what’s happening as I make the unit test pass, so I start live unit tests with these steps:
- From the Preferences menu, choose Package Settings: Live Coding. That opens two panes. The one on the left is default settings for the package, and the one on the right is your user settings. You can copy settings from the left to the right, and then uncomment the ones you want to use.
- If you haven’t already done so, set the
python_executablesetting. Use a virtual environment if you want access to all the packages installed in that virtual environment. -
Set the
driversetting to run your unit test. The user settings should now look something like this:{ // Uncomment any of these settings to override the defaults. // Location of python interpreter to run the code tracer. // Point to a virtualenv's python command to use all its packages. "python_executable": "/home/you/venv/bin/python3.8", // Driver script to launch the file you're editing. Use -m for a module. "driver": "-m unittest test_anagrams.py" } - Save settings and close the settings window.
- If the live coding display is still open from the first section, choose Reset from the Live Coding menu.
- Open the
anagrams.pyfile. -
From the Live Coding menu, choose Start. You should see something like this:
                        | ---------------- |
                        | SystemExit: True |
                        | ---------------- |  def count_anagrams(words): | words = ['apple', 'melon']
 return 0               | return 0
Now I can see the input parameters and the return value, as well as the fact that the test failed. Next, I make that test pass with the simplest code that could possibly work.
def count_anagrams(words): | words = ['apple', 'melon']
    return len(words)      | return 2
Once the test passes, I can add another test method with another scenario. This one includes two copies of ‘melon’, so the number of unique words is still two.
def test_duplicate_words(self):
    words = ['apple', 'melon', 'melon']

    n = count_anagrams(words)

    self.assertEqual(2, n)
I could make the test pass now, but it’s a little confusing when both tests are being displayed.
                           | ---------------- |
                           | SystemExit: True |
                           | ---------------- |
def count_anagrams(words): | words = ['apple', 'melon', 'melon'] | words = ['apple', 'melon']
    return len(words)      | return 3                            | return 2
Instead, I’ll only run the new test method. That becomes even more useful as we add more and more test methods. Open the settings, and change the driver:
"driver": "-m unittest test_anagrams.AnagramsTest.test_duplicate_words"
That only runs the current test method. Save the settings, switch to the
anagrams.py file, and make a small change. Now you can see the failing test on
its own.
Each time you add a new test, change the driver command to run that test. It’s
even easier if you start by calling each new test test(), and then rename it
once it passes. Then you can just leave the driver command the same as you add
each new test.
                           | ---------------- |
                           | SystemExit: True |
                           | ---------------- |
def count_anagrams(words): | words = ['apple', 'melon', 'melon']
    return len(words)      | return 3
To remove duplicates, just put all the words into a set before counting.
def count_anagrams(words): | words = ['apple', 'melon', 'melon']
    anagrams = set()       | anagrams = set()
    for word in words:     | word = 'apple'       | word = 'melon'                | word = 'melon'
        anagrams.add(word) | anagrams = {'apple'} | anagrams = {'apple', 'melon'} |
    return len(anagrams)   | return 2
When you get to the second copy of ‘melon’, the set doesn’t change.
Now we get to the interesting part: detecting anagrams.
def test_anagrams(self):
    words = ['apple', 'melon', 'lemon']

    n = count_anagrams(words)

    self.assertEqual(2, n)
One way is to sort the letters in each word.
def count_anagrams(words): | words = ['apple', 'melon', 'lemon']
    anagrams = set()       | anagrams = set()
    for word in words:     | word = 'apple'       | word = 'melon'                | word = 'lemon'
        word = ''.join(    | word = 'aelpp'       | word = 'elmno'                | word = 'elmno'
            sorted(word))  |                      |                               |
        anagrams.add(word) | anagrams = {'aelpp'} | anagrams = {'elmno', 'aelpp'} |
    return len(anagrams)   | return 2
You can see that the second and third iteration of the loop convert
‘melon’ and ‘lemon’ to ‘elmno’, and the set of anagrams doesn’t
change in the third iteration.
The next feature I want to add is to treat upper case and lower case the same, so I add a new test case.
def test_upper(self):
    words = ['Melon', 'Lemon']

    n = count_anagrams(words)

    self.assertEqual(1, n)
Of course, it doesn’t pass.
                           | ---------------- |
                           | SystemExit: True |
                           | ---------------- |
def count_anagrams(words): | words = ['Melon', 'Lemon']
    anagrams = set()       | anagrams = set()
    for word in words:     | word = 'Melon'       | word = 'Lemon'
        word = ''.join(    | word = 'Melno'       | word = 'Lemno'
            sorted(word))  |                      |
        anagrams.add(word) | anagrams = {'Melno'} | anagrams = {'Lemno', 'Melno'}
    return len(anagrams)   | return 2
You can see that ‘Melon’ and ‘Lemon’ get sorted into ‘Melno’ and ‘Lemno’, because upper-case letters sort before lower-case letters. We can fix that by switching all the words to lower case.
                            | ---------------- |
                            | SystemExit: True |
                            | ---------------- |
def count_anagrams(words):  | words = ['Melon', 'Lemon']
    anagrams = set()        | anagrams = set()
    for word in words:      | word = 'Melon'       | word = 'Lemon'
        word = ''.join(     | word = 'Melno'       | word = 'Lemno'
            sorted(word))   |                      |
        word = word.lower() | word = 'melno'       | word = 'lemno'
        anagrams.add(word)  | anagrams = {'melno'} | anagrams = {'melno', 'lemno'}
    return len(anagrams)    | return 2
Oops, ‘Melon’ and ‘Lemon’ now get sorted into ‘melno’ and ‘lemno’. We fixed the case, but not the sort order. Switching to lower case before sorting the letters will fix it.
def count_anagrams(words):  | words = ['Melon', 'Lemon']
    anagrams = set()        | anagrams = set()
    for word in words:      | word = 'Melon'       | word = 'Lemon'
        word = word.lower() | word = 'melon'       | word = 'lemon'
        word = ''.join(     | word = 'elmno'       | word = 'elmno'
            sorted(word))   |                      |
        anagrams.add(word)  | anagrams = {'elmno'} |
    return len(anagrams)    | return 1
Finally, I want to handle foreign words correctly. For example, the German word for street can be written either as ‘Straße’ or ‘Strasse’. Python knows how to convert from one to the other, so I’ll add another test case.
def test_case_folding(self):
    words = ['Straße', 'Strasse']

    n = count_anagrams(words)

    self.assertEqual(1, n)
When I run the new test case, the words are counted separately.
                            | ---------------- |
                            | SystemExit: True |
                            | ---------------- |
def count_anagrams(words):  | words = ['Straße', 'Strasse']
    anagrams = set()        | anagrams = set()
    for word in words:      | word = 'Straße'       | word = 'Strasse'
        word = word.lower() | word = 'straße'       | word = 'strasse'
        word = ''.join(     | word = 'aerstß'       | word = 'aerssst'
            sorted(word))   |                       |
        anagrams.add(word)  | anagrams = {'aerstß'} | anagrams = {'aerssst', 'aerstß'}
    return len(anagrams)    | return 2
To fix it, I just switch lower() to casefold().
def count_anagrams(words):     | words = ['Straße', 'Strasse']
    anagrams = set()           | anagrams = set()
    for word in words:         | word = 'Straße'        | word = 'Strasse'
        word = word.casefold() | word = 'strasse'       | word = 'strasse'
        word = ''.join(        | word = 'aerssst'       | word = 'aerssst'
            sorted(word))      |                        |
        anagrams.add(word)     | anagrams = {'aerssst'} |
    return len(anagrams)       | return 1
You can see that casefold() converts ‘ß’ to ‘ss’, while still
converting ‘S’ to ‘s’, and the test passes.
Now that I’ve made each test pass, I run the full test suite again to make sure I didn’t break any of the other tests. I run the unit tests from the shell again.
Ran 5 tests in 0.002s

OK
It looks good, so I can publish my new library.
Matplotlib Preview
The Matplotlib graphing library has a lot of features, and it can be easier to fiddle with the settings if you have a preview that updates as you change them. I can see a preview by typing the following code, and then choosing Start Canvas from the Live Coding menu.
import matplotlib.pyplot as plt
import numpy as np

x = np.linspace(-np.pi, np.pi)
c, s = np.cos(x), np.sin(x)

plt.plot(x, c)
plt.plot(x, s)

plt.show()
If I decide that I’d rather put the tick marks at π and -π, I can add a
call to plt.xticks(), and the preview immediately updates.
import matplotlib.pyplot as plt
import numpy as np

x = np.linspace(-np.pi, np.pi)
c, s = np.cos(x), np.sin(x)

plt.plot(x, c)
plt.plot(x, s)
plt.xticks(np.linspace(-np.pi, np.pi, 3))

plt.show()
There are lots of Matplotlib tutorials around, and this preview can be useful for following along with a tutorial.
Pyglet Preview
Pyglet is a library for building user interfaces, and I can preview the user interface in the Live Canvas view.
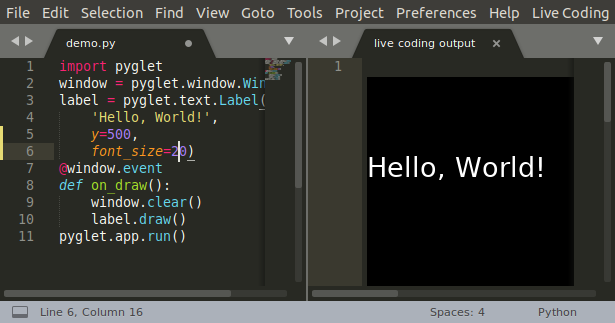
See the Pyglet documentation for details on how to build an interface.
Learn More
There are some extra features available if you install the space tracer library. Remember, you can find installation instructions and descriptions of all the other Live Coding in Python plugins and tools by visiting donkirkby.github.io. Help me test it, and report your bugs. I’d also love to hear about any other projects working on the same kind of tools.